What is Jira automation? Exploring key features and advantages
Tempo Team
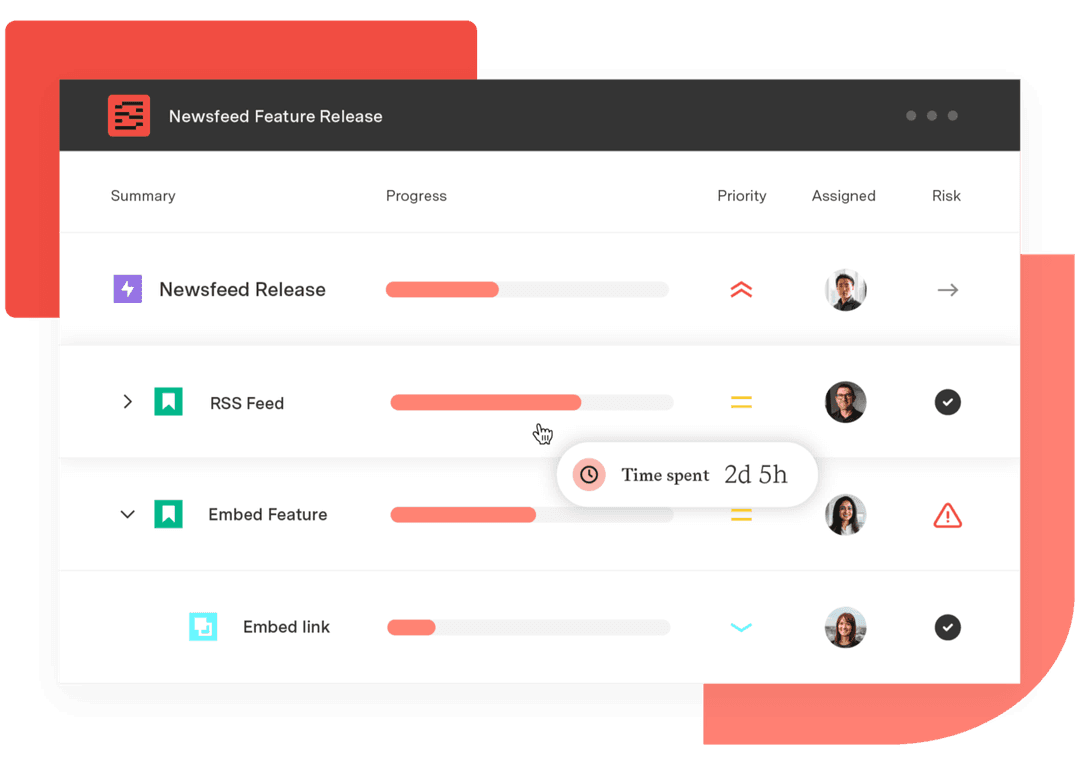
For project managers, Atlassian’s Jira is the go-to tool for organizing projects, assigning tasks, and tracking bugs or issues. A significant driver of Jira’s popularity is its workflow automation functionality, which saves time and boosts efficiency.
If you’re new to Jira automation, learning to leverage the feature will allow you to create triggers, conditions, and actions to systemize manual and repetitive tasks, boosting productivity for you and your team by freeing you to focus on critical tasks.
What is Jira automation, and why is it important?
Jira software is a project management and issue-tracking tool that supports project teams in planning, tracking, and managing their work. Atlassian has equipped the Jira application and its sister programs, Jira Work Management (JWM) and Jira Service Management (JSM), with automation functions that allow the system to perform tedious tasks for you. Here are the benefits:
Efficiency and productivity
Automated tasks reduce the amount of time you and project team members spend on repetitive work, like
Updating statuses
Assigning tasks
Adding comments
Synching parent and sub-tasks
Sending email reminders to task assignees or clients
The possibilities are limited only by your imagination and your organization’s internal processes. Atlassian has created a Jira automation template library of everyday use cases to get your team set up and save you hundreds of work hours every month.
Consistency and accuracy
Automating Jira standardizes business processes, removing the potential for human error and ensuring tasks are executed accurately and consistently.
Enhanced project management
Jira project automation improves transparency and collaboration by facilitating communication among stakeholders and team members. The platform allows you to build rules based on the project’s communication plan, keeping the team, management, and external stakeholders apprised of project status updates, alerts, and escalations.
Customizable
Jira’s flexibility allows you to tailor automation rules and triggers to align with your team’s unique processes and requirements.
Integration
Automations aren’t limited to the Jira platform. It also supports rule development, integrated third-party apps like BitBucket and GitLab, associated software like Confluence, and tools available on the Atlassian Marketplace.
Automating Jira: How does it work?
When you create an automation within the Jira app, you establish rules the software will follow to complete a task. Automations range from simple jobs, like auto-assigning an issue to a team member, to more complex functions, such as creating sub-tasks within a parent or simultaneously updating multiple fields. No matter the complexity, three elements establish an automation rule, with an optional fourth.
1. Triggers
These are predefined events that launch the Jira automation. Some triggers are predefined within the software, such as issue creation and status updates. Alternatively, you can create a custom trigger to suit specific events.
2. Conditions
Once you’ve configured the trigger, create a filter to determine whether the system should execute the rule. Developers call these filters “conditions,” and they include priority changes or entering a specific field value. Conditions act as validators, ensuring automation only occurs in the presence of user-established criteria.
3. Actions
When an event trips the trigger and meets predefined conditions, Jira will activate the automation to perform one or more actions, such as merging fields, transitioning issues, or sending email notifications.
4. Branches and loops (optional)
Adding a branch to your automation allows you to set conditions and actions that affect rules outside the one you’re currently defining. For example, if you close an issue, you can simultaneously trigger the addition of a comment into its subtasks and send a notification to the client.
A loop tells Jira to execute an automation a specified number of times. For example, if every new issue requires three subtasks, you can program Jira to automatically add them to the ticket.
Where to start?
You must first choose an automation development option: Automation for Jira or ScriptRunner. Both are available through the Atlassian Marketplace app.
ScriptRunner requires a developer with knowledge of Groovy to build and maintain automation rules in case updates to Jira API render the code inoperative. Also, Jira cloud- and server-based software have different requirements, meaning you can’t reuse your code.
Alternatively, Automation for Jira is an “if this, then that” no-code solution for non-developers. It uses a simple and intuitive user interface to build automation rules in minutes.
If you’re unsure which Jira automation app to choose, speak to your development team or review each platform’s support documentation to help you decide.
4 common automation rules
Jira includes many options to optimize workflows and productivity through automation. Here are the top four Jira automations to integrate into your process:
1. Sync parent and sub-tasks
With the automation feature, teams no longer need to manually update parent issues when sub-tasks are completed or altered. For example, if the child task status is converted from “In progress” to “Complete,” the parent issue status is synchronized.
2. Due date reminders
Stop chasing your team down to remind them of significant project milestones and deadlines. Instead, create a rule using Jira automation to send out reminders via email or a communication channel like Slack based on a schedule set in your project plan.
3. Auto-close completed issue
Automate daily verification of support tickets in Jira Work or Service Management. Should a ticket fail to receive a customer response in more than five days, for example, you can set up a rule to automatically:
Close the ticket
Notify the client that the issue is no longer active
Allow the client to return and comment on the ticket
4. Synchronize support and development tickets
Requests for IT support often require additional work from the development team. When this happens, it’s best practice to link the support ticket with a development ticket and sync them. This way, the support team will receive an alert when developers complete the update and close the ticket.
Jira automation example: Creating sub-tasks on issue creation
Creating a sub-task is a commonly requested rule and ideal for exploring the Automation for Jira platform. In this instance, you would design an automation to perform the following four actions:
It will generate three subtasks when you create an issue labeled “New Starter.”
To establish context, each sub-task will copy and paste data such as name, phone number, and email address from the parent.
Associated application owners will be notified of a pending “New Starter” request and receive a sub-task assignment.
If the parent issue updates (e.g., the email address changes), each sub-task will automatically adjust to match.
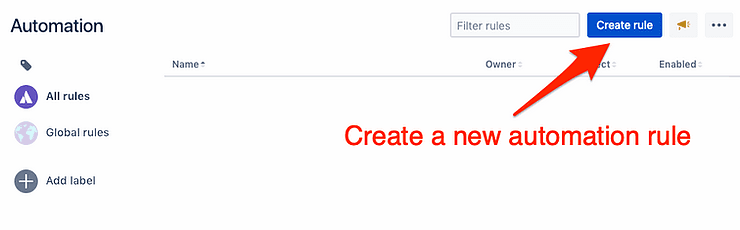
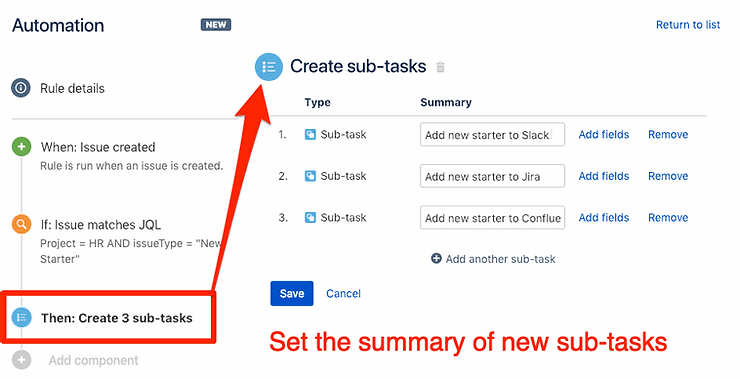
Step 1: Create a new automation rule
Begin by clicking the blue “Create rule” button at the top of the Jira dashboard.
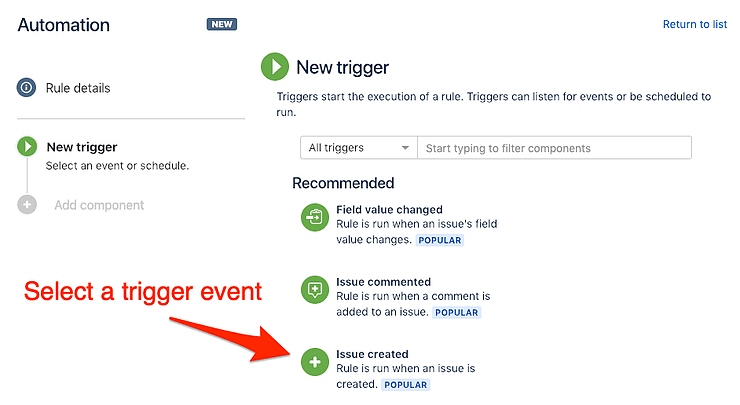
In the “Automation” section, define the automation trigger event by selecting “Issue created” under the “New trigger” dropdown.
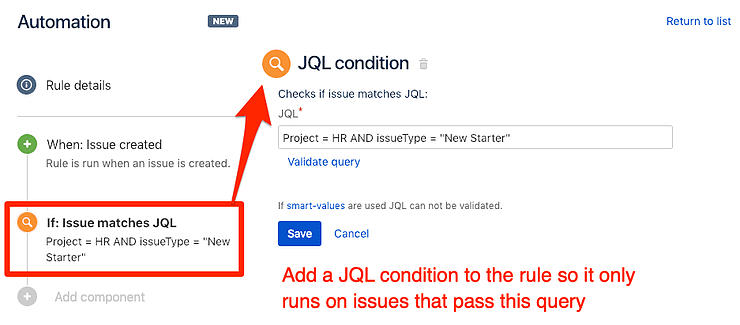
Next, add a JQL condition to the rule to establish the automation’s controlling criteria.
Finally, create a summary of new sub-tasks within the automation.
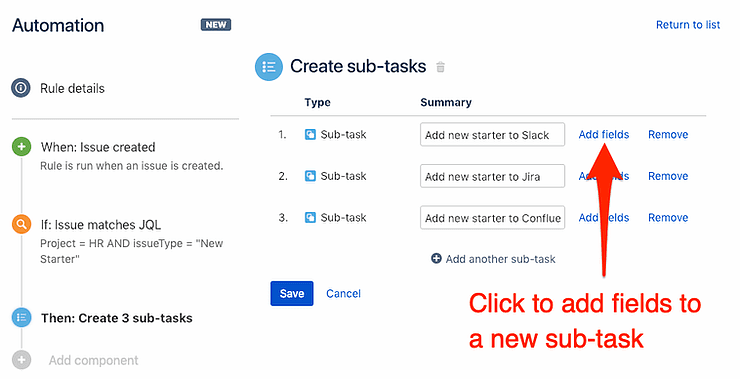
Step 2: Copy data from the parent to populate fields within the sub-tasks
You’ll still be working with the “Create sub-tasks” window, so click “Add fields” next to each task summary.
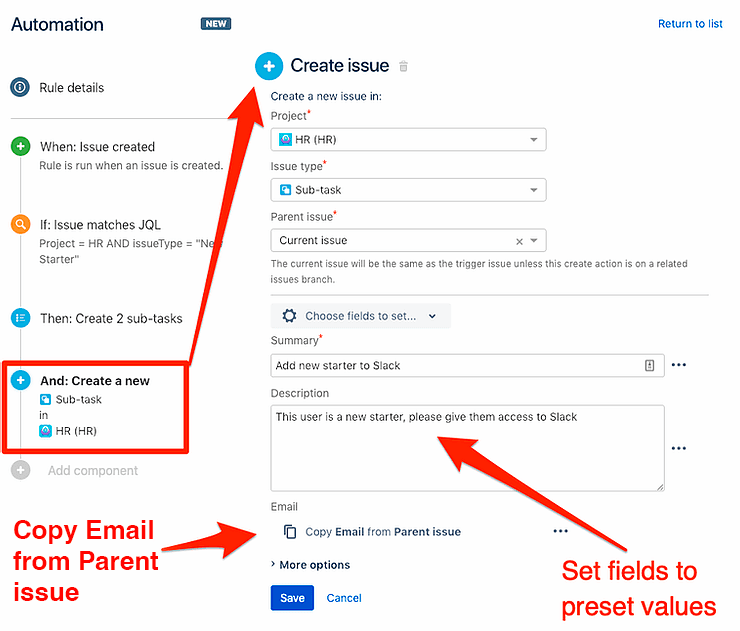
Click the “+” button next to “Create issue,” then set the “Project” field to your current project, in this case, “HR (HR).” Define the issue type as “Sub-task” if the field isn’t pre-populated. Ensure the “Parent Issue” is set to “Current issue,” then populate the “Description” field to preset values. Finally, select “Copy fields from parent issue” by clicking on the “…” located below the “Description” field.
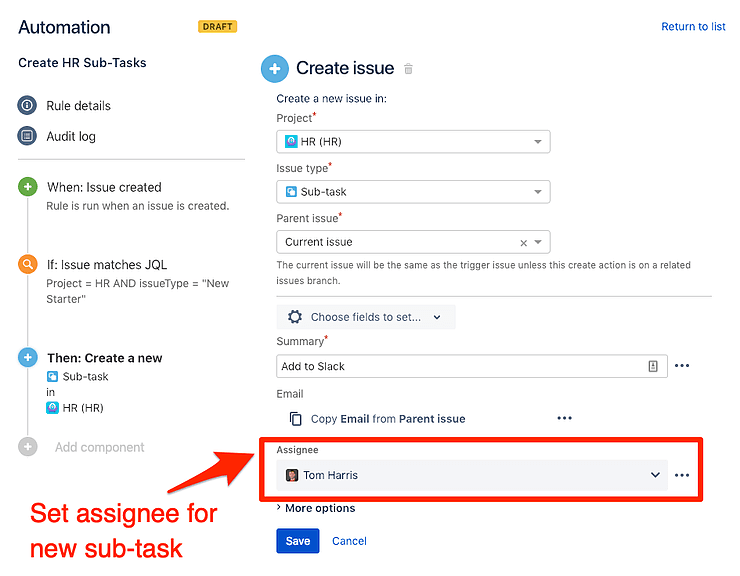
Step 3: Set default assignee
Remaining in the “Create issue” window, click “More options” for additional features. Select the “Choose fields to set…” menu and click on “Assignee” under “Available fields.”

Finally, select your assignee for the sub-task from the dropdown.
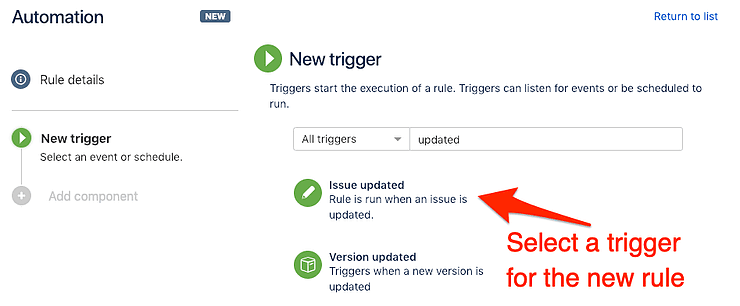
Step 4: Trigger a new action to keep parent and sub-tasks in sync
Return to the “New trigger” screen and select “Issue updated” from the dropdown.
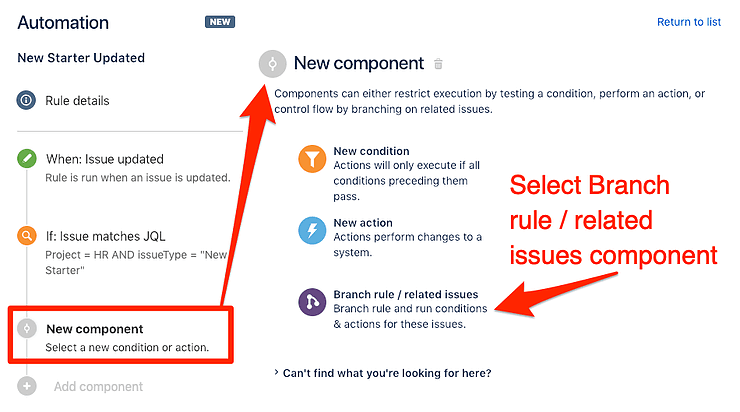
Select “Branch rule / related issue” from the “New component” window.
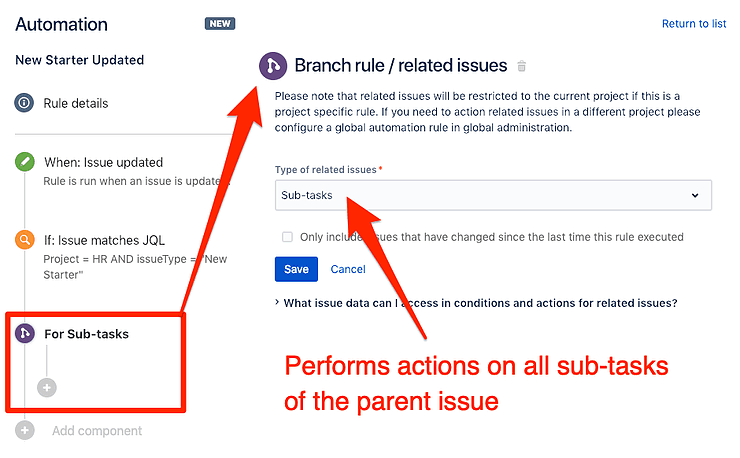
Set the “Type of related issues” field to “Sub-tasks” to direct Jira to perform all the defined actions on the parent’s sub-tasks.
Click “Edit issue,” then choose which fields to copy from the parent and paste into the sub-tasks.
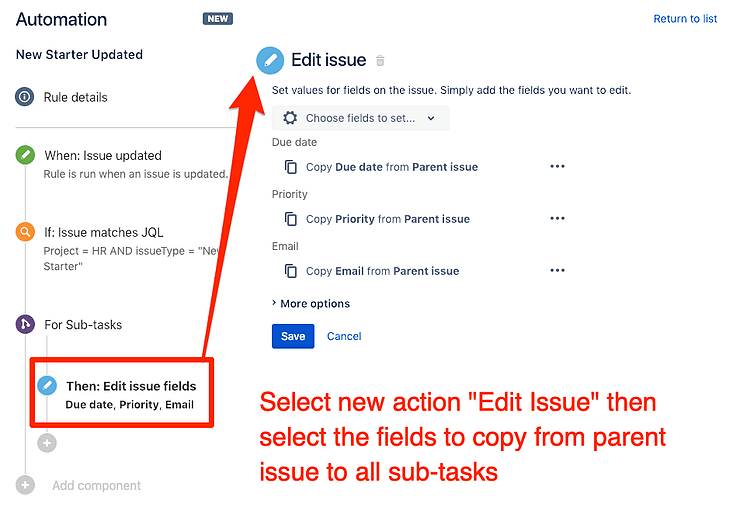
Click the blue “Save” button, and that’s it. Congratulations, you created your first Jira automation!
Final words
You can save time and increase the efficiency of your business processes by integrating automations into your Jira platforms. But the improvements don’t stop there. Tempo offers an array of Jira-enabled applications to optimize project management. Timesheets is a resource and time tracking tool. Structure PPM is our portfolio management application.
Everything you need to streamline your software development and other project work is available from Tempo.
Sign up for a demo
Request Demo